


Table of Contents
- How to Design Custom Charm Bracelets: What You'll Need First
- Best Materials for DIY Charm Bracelets
- Selecting Your Bracelet Base and Chain Style
- How to Attach Charms to a Bracelet
- Charm Bracelet Design Ideas and Aesthetic Balance
- Personalizing with Engravings and Initial Pendants
- Custom Charm Bracelet Tools and Techniques
- Step-by-Step Assembly Process
How to Design Custom Charm Bracelets: A Complete Guide
Last Updated: August 3, 2026
Creating personalized jewelry that tells a story is one of the most meaningful ways to celebrate relationships and milestones. At Treasure Charms, we understand that designing custom charm bracelets goes far beyond stringing beads together, it's about crafting something with intention, quality, and lasting sentimental value. Whether assembling a bracelet for yourself or creating a heartfelt gift, the process combines thoughtful design choices with practical assembly knowledge.
How to Design Custom Charm Bracelets: What You'll Need First
Before selecting charms, gather essential tools and set up a proper workspace. Quality tools make assembly faster, more precise, and far less frustrating.
Essential Tools for Assembly
You'll need two pairs of chain-nose or flat-nose pliers to grip and manipulate jump rings without damaging them. Round-nose pliers are optional for creating loops. Jewelry wire cutters cleanly trim excess wire or chain. A small ruler ensures proper fit, and a beading mat prevents charms from rolling away and protects delicate pieces from scratches.
Workspace Setup
Your workspace should be organized and well-lit. A small table with a lamp positioned directly over your work area prevents eye strain and helps you see jump ring openings clearly. Lay out all materials before starting: charms, bracelet base, findings, and tools. Keep tiny components like jump rings in a small bowl or tray to prevent loss.
Best Materials for DIY Charm Bracelets
The materials you choose determine how long your bracelet lasts and whether it feels like a quality piece. Investment in better materials pays dividends, a bracelet made with quality findings will be worn for years.
Metal Quality and Durability
Sterling silver remains the gold standard for charm bracelets because it's durable, doesn't tarnish excessively, and develops a beautiful patina over time. Look for the ".925" hallmark, which certifies the metal content. Sterling silver costs more upfront but resists corrosion and can be polished if needed.
Gold vermeil, sterling silver plated with a thick layer of gold, offers an elegant appearance at lower cost than solid gold. The gold layer must be at least 2.5 microns thick to qualify as vermeil. However, vermeil can wear through with frequent wear and water exposure.
Solid gold (14K or 18K) is the most durable option, suitable for heirloom pieces. Fourteen-karat gold contains 58.3% pure gold and resists tarnishing entirely. Avoid nickel-plated findings, which can cause allergic reactions and corrode rapidly.
Bracelet Base Options
Link chains offer versatility and allow you to customize charm spacing. Cable chains, made of oval or round links, are sturdy and classic. Curb chains, with interlocking flat links, create a more substantial appearance.
Expandable bangles work well for charm bracelets where you want charms to slide freely around the circumference. These adjustable bracelets fit most wrist sizes without needing a clasp. However, charms may shift during wear.
Solid bracelets with fixed link spacing let you position each charm precisely. The downside is that adding or removing charms later requires breaking the chain.
Selecting Your Bracelet Base and Chain Style
The bracelet base you choose sets the tone for the entire piece. Think about how you want the final bracelet to feel: delicate and understated, bold and statement-making, or somewhere in between.
Link and Cable Chains
Cable chains are perhaps the most versatile, the uniform oval links work with nearly any charm aesthetic. They're also durable and less likely to kink than thinner chain styles. Curb chains create a flatter, more substantial appearance and are exceptionally strong. Rolo chains, made of perfectly round links, offer a delicate, refined look but are less sturdy than cable or curb.
Consider the width of the chain in relation to your charms. A delicate 1mm cable chain looks dwarfed by large statement charms, while a heavy 3mm chain overpowers tiny pendants. Aim for visual balance.
Expandable Bangles and Toggle Closures
Expandable bangles eliminate the need for clasps, which appeals to people who find traditional closures fiddly. The main drawback is that charms can migrate during wear, and constant flexing may eventually weaken the metal.
Toggle closures, a simple ring and bar mechanism, offer a secure, decorative way to fasten a bracelet. Lobster clasps are the most secure option, these claw-like clasps open when you press a small lever, then snap shut to hold the bracelet firmly in place. Select a clasp proportionate to your chain width.
How to Attach Charms to a Bracelet
The method you use to attach charms directly impacts how secure they are and how professional the finished bracelet looks.
Working with Jump Rings
Jump rings are small metal loops that connect charms to the bracelet base. Sterling silver jump rings are worth the investment because they're less likely to break or bend permanently out of shape.
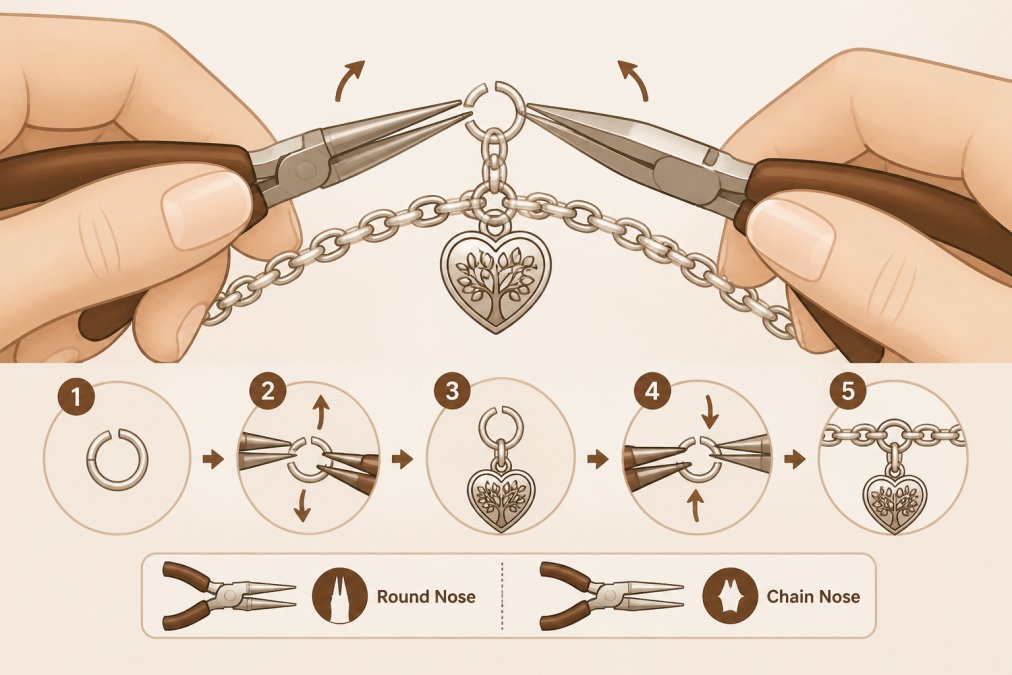
To attach a charm, hold the ring steady with one pair of pliers while using the second pair to gently open it by twisting the ends sideways, not pulling them apart straight. Slide the charm onto the open jump ring, then slide the ring onto a chain link. Close the ring by twisting it back to its original position. The ends should meet flush with no visible gap.
A common mistake is opening jump rings too wide, which permanently deforms them. Open them just enough to slide your charm on, typically a 2-3mm gap is sufficient.
Securing Charms with Lobster Clasps and Bead Stoppers
Some charms come with pre-attached loops, making them easy to hang directly from jump rings. Lobster clasps can be used to attach individual charms rather than just to close the bracelet. Bead stoppers are small metal or rubber components that grip the bracelet chain, allowing you to position charms at specific points without them sliding.
Safety chains provide extra security for valuable or sentimental charms. Attach a small chain between a charm's attachment point and the bracelet base. If the main attachment fails, the safety chain prevents the charm from being lost.
Charm Bracelet Design Ideas and Aesthetic Balance
Designing a visually cohesive charm bracelet requires thinking about color, size, spacing, and theme.
Creating a Cohesive Theme
Start by deciding on a theme or concept for your bracelet. This might be a color palette, a life milestone, a hobby or interest, or a collection of memories. A clear theme helps you select charms that work together rather than feeling like a random assortment.
For a travel-themed bracelet, select charms representing destinations you've visited or dream of visiting. Keep the metal consistent and limit your color palette to 2-3 complementary hues. Consider the person wearing the bracelet, what matters to them? The most meaningful custom charm bracelets reflect the wearer's personality and values.
Spacing and Visual Weight
How you space charms along the bracelet dramatically affects the overall appearance. Densely packed charms create a bold, statement-making look, while spaced-out charms feel elegant and minimalist.
Large, heavy charms need more breathing room than delicate, small ones. If mixing charm sizes, place larger pieces with more space between them and cluster smaller charms more closely. Distribute heavier pieces evenly around the circumference to prevent the bracelet from rotating uncomfortably on your wrist. Spacer beads help create visual separation and allow you to space charms more precisely.
Personalizing with Engravings and Initial Pendants
Custom engraving transforms a charm bracelet from beautiful to deeply personal. Initials, names, dates, or short meaningful phrases can be engraved onto sterling silver or gold charms.
Initial charms are among the most popular personalization options. For a couple's bracelet, intertwined initials or separate initial charms for each person create a romantic, personalized piece. Engraving dates, birthdays, or anniversaries adds another layer of meaning.
Keep engraved text short, most charm surfaces accommodate 1-3 initials or a short date comfortably. Professional jewelers use precise equipment that creates crisp, evenly-spaced text. DIY engraving often looks uneven or shallow. If personalization is important, invest in professional engraving.
Custom Charm Bracelet Tools and Techniques
Several specialized tools and techniques elevate your bracelet-making skills and allow you to work with a wider variety of charms and findings.
Jewelry Pliers and Findings
Nylon-jaw pliers have nylon tips that grip without marring soft metals like gold or copper. They're particularly useful when opening and closing jump rings repeatedly. Crimping pliers are essential if you plan to use crimp beads, which secure beads or charms onto beading wire.
Findings, the metal components that make jewelry assembly possible, come in endless varieties. Beyond jump rings and clasps, you'll encounter bead caps, filigree spacers, and connector charms. Quality findings in sterling silver or gold-filled materials look professional and last indefinitely.
Safety Chains and Clasp Security
A safety chain provides backup security if the main attachment fails. Attach one end to the charm's attachment point and the other end to the bracelet chain using a jump ring. This is especially important for expensive or irreplaceable charms.
Test clasp security before wearing the finished bracelet. Open and close your lobster clasp 5-10 times to ensure it operates smoothly and locks firmly. Check jump ring connections by gently tugging each charm, it should not move or wiggle.
Step-by-Step Assembly Process
Now that you understand materials, tools, and attachment methods, let's walk through the actual assembly of your custom charm bracelet.
Measuring Your Wrist
Wrap a soft measuring tape around your wrist where you normally wear bracelets. A comfortable bracelet should have about 0.5-1 inch of extra room beyond your wrist measurement. Write down your measurement.
Calculate how much chain you need by subtracting 1-1.5 inches from your target length to account for the clasp and attachment hardware. For example, if the target length is 8 inches, you'd need approximately 6.5-7 inches of chain.
Building Your Bracelet
Lay out all your charms in the order you want them to appear on the finished bracelet. Take a photo of this layout so you can reference it during assembly.
Attach your lobster clasp to one end of your chain using a jump ring. Open the jump ring, slide it through both the clasp loop and the last link of your chain, then close it firmly. Tug the clasp to ensure it's secure.
Attach a small loop or ring to the opposite end of the chain. Attach your first charm to the chain using a jump ring, positioning it approximately 1 inch from the clasp to prevent the clasp from catching on your skin when wearing the bracelet.
Continue attaching charms in the order you planned, spacing them according to your design vision. Step back frequently to assess the overall appearance. Put the bracelet on your wrist periodically to see how it looks in context, charms that seemed perfectly spaced on the table might feel crowded when worn.
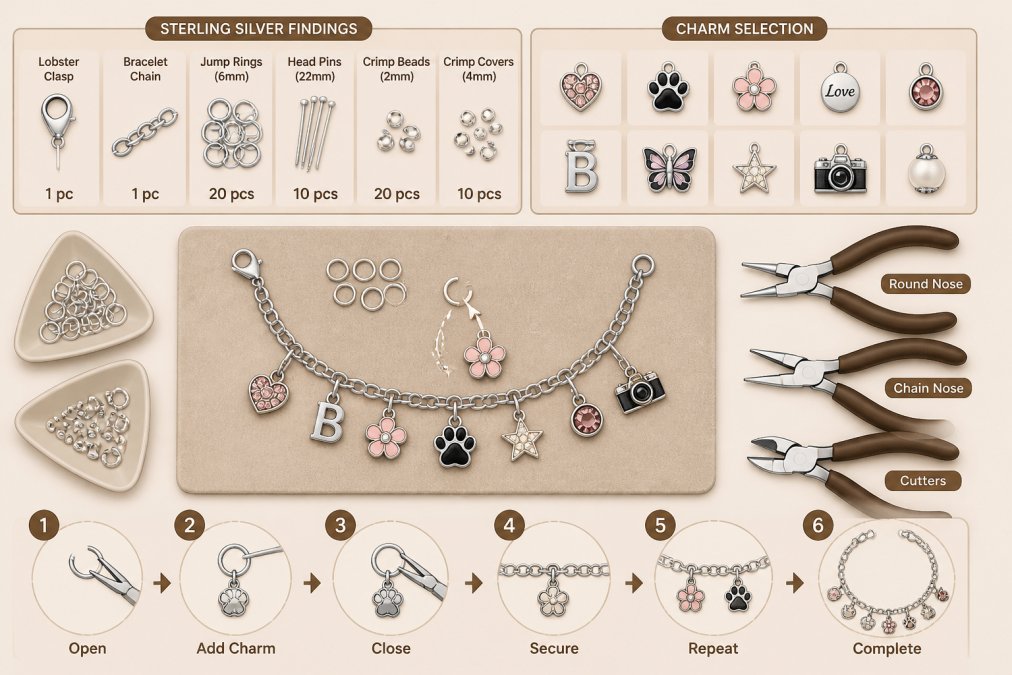
Once all charms are attached, do a final security check. Tug each charm gently. Open and close the lobster clasp 10 times to ensure it functions smoothly. Examine all jump ring connections to confirm they're closed completely with no visible gaps.
| Assembly Step | Time Required | Key Focus |
|---|---|---|
| Measuring wrist and calculating chain length | 5 minutes | Accuracy ensures proper fit |
| Gathering and organizing all materials | 10 minutes | Organization prevents lost components |
| Attaching clasp and loop hardware | 5 minutes | Secure closure is essential |
| Attaching individual charms | 20-40 minutes | Spacing and visual balance matter |
| Final security check | 5 minutes | Prevents lost charms during wear |
The entire assembly process typically takes 45 minutes to an hour for a bracelet with 5-8 charms. Don't rush, taking time to position charms thoughtfully and check connections thoroughly results in a bracelet you'll be proud to wear or gift.
Creating a custom charm bracelet that you or someone you love will treasure requires attention to materials, thoughtful design choices, and careful assembly. Treasure Charms specializes in helping you bring these visions to life with high-quality, USA-assembled components and personalized options that transform a simple bracelet into a meaningful keepsake. Whether marking an anniversary, celebrating a milestone, or creating a living timeline of cherished memories, a custom charm bracelet becomes a wearable story that grows and evolves with the wearer. Start with quality materials, take your time with assembly, and you'll create something that lasts for years.
Frequently Asked Questions
What tools do I really need to design and assemble a custom charm bracelet?
You'll need jewelry pliers (chain-nose and round-nose for opening jump rings), a bracelet base or chain, charms, jump rings, and a lobster clasp or toggle closure for security. A bead stopper helps keep charms in place during assembly. Most DIY kits include these essentials. For personalized engravings, you may need specialized stamping tools or opt for professional engraving services.
How do I choose the best materials for a DIY charm bracelet that will last?
Select sterling silver, gold vermeil, or stainless steel bases for tarnish-resistant durability. Sterling silver is timeless and tarnish-resistant when properly cared for. Gold vermeil offers an affordable gold look. Avoid cheap plated metals that flake easily. Check that jump rings and findings match your base metal to prevent discoloration. Higher-quality metals cost more upfront but last years longer and feel better to wear.
What's the difference between DIY charm bracelet design and having one professionally made?
DIY allows complete creative control and costs less in materials, but requires time, tools, and skill to assemble properly. Professional manufacturing ensures precision, uses industrial-grade equipment, and guarantees quality. For personalized gifts where customization is critical, professional services verify engravings and details before shipping. DIY suits personal projects; professional services work best for meaningful gifts where perfection matters.
How do I ensure my charms stay secure and don't fall off during wear?
Use jump rings sized appropriately for your charms and base chain. Open and close them properly with pliers, never by pulling. Add a safety chain attached to both the bracelet base and a charm for extra security on valuable pieces. Lobster clasps and toggle closures provide secure fastening at the wrist. Check all connections before wearing and periodically inspect for wear, especially on frequently moved charms.
This article was written using GrandRanker


